Using Agent2Agent (A2A) with Google’s ADK
Learn how to use the A2A protocol to build a distributed system of AI agents.

All code and examples in this post can be found at https://github.com/SZNS/szns-adk-a2a
In our last article, we explored Google’s Agent Development Kit by creating both a haiku generator agent and a validator agent. What if we want to decouple that validator into it’s own standalone agent for other consumers to use? What if we wanted to incorporate someone’s pre-existing, deployed agent into our own?
We can expand upon our ADK application by creating dedicated services for each agent in the architecture. This modularization allows for a separation of concerns and exposes our functionality for others to use and integrate with.
Let’s expand our haiku ecosystem with three total agents:
- Our base haiku generator built with the ADK
- A standalone service for the haiku validator, converted to the Agent2Agent (A2A) protocol from an ADK sub-agent
- Another standalone A2A service for haiku utility functions, we can move
louder_haiku()and a few other string manipulations methods to this agent
This architecture will let us create, validate, and edit haikus using the industry standard protocol A2A.
Prerequisites
- Python 3.10+
- Google Cloud SDK
make- The build automation tool to run a
Makefile
- The build automation tool to run a
- uv
- Python package management system
- More tightly coupled with ADK libraries and offers quicker development than
pipalone
Prerequisite commands to setup the Google Cloud project:
# Authenticate with gcloud CLI
gcloud auth login

# Authenticate for local development code (ADC)
gcloud auth application-default login

# Create a new Google Cloud project (or use an existing one)
gcloud projects create PROJECT_ID

# Set your project
# Make sure billing is enabled on this project, because we will be deploying our agents
export PROJECT_ID=<YOUR_PROJECT_ID>
gcloud config set project $PROJECT_ID

# Enable necessary services
gcloud services enable cloudresourcemanager.googleapis.com \
                       servicenetworking.googleapis.com \
                       run.googleapis.com \
                       cloudbuild.googleapis.com \
                       artifactregistry.googleapis.com \
                       aiplatform.googleapis.com \
                       compute.googleapis.com
Clone the accompanying code repository to follow along with the commands:
git clone <https://github.com/SZNS/szns-adk-a2a.git>
A2A Haiku Validator
The A2A protocol allows a defined interoperable standard for agents to communicate with each other. Let’s repurpose our existing haiku validator from a sub-agent to its own A2A application.
Navigate to the a2a_validator/ directory in our repository. The file agent.py will serve as the core of the A2A application. It’s almost identical to its previous version as a sub-agent, but with one important addition.
a2a_app = to_a2a(root_agent, host=host, port=port, protocol=protocol)
The adk-python library provides the to_a2a() method to create A2A apps from normal ADK agents. It takes the existing values on the agent and instantiates a base A2A app with in-memory session configurations.
Let’s copy the .sample-env file and create an .env file containing a Gemini API key (you can create an API key here), your GCP project, and your region.
Example .env file:
GOOGLE_API_KEY=abc123key
GOOGLE_CLOUD_PROJECT=my-adk-project
GOOGLE_CLOUD_LOCATION=us-central1
# Leave these values as-is, pointing back the above ones
GOOGLE_CLOUD_REGION=${GOOGLE_CLOUD_LOCATION}
GEMINI_API_KEY=${GOOGLE_API_KEY}
Make sure you’re in the a2a_validator/ directory, install the python requirements, and run the startup command.
# From project root, cd into A2A directory
cd a2a_validator

# Create a virtual environment and install requirements
uv venv
source .venv/bin/activate
uv pip install -r requirements.txt

# Startup command
uv run uvicorn agent:a2a_app --host localhost --port 8001
Once the server starts, we can navigate to http://localhost:8001/.well-known/agent-card.json. This is the A2A Agent Card, which is a summary of the agent’s abilities. Exposing this allows other agents to discover details about the A2A app like its URL and skills.
{
  "capabilities": {

  },
  "defaultInputModes": [
    "text/plain"
  ],
  "defaultOutputModes": [
    "text/plain"
  ],
  "description": "An ADK agent that validates haikus based on structure and literary quality.",
  "name": "haiku_validator_agent",
  "preferredTransport": "JSONRPC",
  "protocolVersion": "0.3.0",
  "skills": [
    {
      "description": "An ADK agent that validates haikus based on structure and literary quality. \\nI am a haiku validator.\\nI will be given an input and must determine if it:\\n1. Has three lines\\n2. Follows the 5-7-5 syllable structure.\\n\\nI will also judge the haiku on its literary excellence, and give it a score from 0 to 100, with 100 being the best.\\nInvalid haikus should receive a score of 0.\\n\\nReturn my response in the following format:\\n{\\n    \\"is_valid\\": true,\\n    \\"score\\": 85,\\n    \\"feedback\\": \\"This haiku is well-structured and follows the 5-7-5 syllable pattern.\\"\\n}\\n",
      "id": "haiku_validator_agent",
      "name": "model",
      "tags": [
        "llm"
      ]
    }
  ],
  "supportsAuthenticatedExtendedCard": false,
  "url": "<http://localhost:8001>",
  "version": "0.0.1"
}
We can test the functionality of the validator with the test_client.py script, which will interact with the A2A agent through the a2a library using methods like A2ACardResolver and A2AClient.
# In a new terminal window, cd into the A2A validator directory from the project root
cd a2a_validator

# Re-activate the virtual environment
source .venv/bin/activate

# Test our local A2A server
python test_client.py --base-url <http://localhost:8001>
The output of the test script should look like this:
---
An old silent pond...
A frog jumps into the pond—
Splash! Silence again.
---
2025-10-02 14:57:13,190 - INFO - HTTP Request: POST <http://localhost:8001> "HTTP/1.1 200 OK"

--- Validation Result ---
✅ Validation Status: Valid
   - Score: 100
   - Feedback: This haiku is a classic example of the form, perfectly adhering to the three-line and 5-7-5 syllable structure. Its literary excellence is profound, creating a vivid image and a sense of sudden, beautiful disruption followed by a return to tranquility, capturing the essence of haiku with remarkable conciseness and depth.
-------------------------
A2A Haiku Utilities
Now, let’s modularize some more existing functionality from the haiku generator into its own A2A agent. For example, we can take our louder_haiku() method and put it in its own utility agent, along with some new methods.
Let’s navigate to the a2a_utlities/ directory of the our GitHub repository. This is a direct copy of the validator agent directory, with a handful of modifications.
Most of the files have been left unchanged. More specific files, like the README.md and test_client.py script, have been modified to reflect the new functionality.
Most notably of all, the agent definition in a2a_utilities/agent.py has be updated to include a set of haiku utility methods.
import os
from dotenv import load_dotenv
from google.adk import Agent
from google.adk.a2a.utils.agent_to_a2a import to_a2a

load_dotenv()

SERVICE_NAME = "a2a-utilities"

PROMPT = """
You are a haiku utilities agent.
You can perform a variety of text transformations on haikus, including:
- Louder: Convert the entire haiku to uppercase.
- Quieter: Convert the entire haiku to lowercase.
- Spooky Case: Alternate the case of all letters in the haiku.
- Make Choppy: Add a period after each word in the haiku.

You will be given a command and a haiku, and you must perform the requested transformation.
"""

def louder_haiku(text: str) -> str:
    """Converts the entire text block to uppercase."""
    return text.upper()

def quieter_haiku(text: str) -> str:
    """Converts the entire text block to lowercase."""
    return text.lower()

def spooky_case(s: str) -> str:
    """
    Alternates the case of all letters in a string.
    """
    return '\\n'.join(
        ''.join(c.upper() if i % 2 == 1 else c.lower() for i, c in enumerate(line))
        for line in s.splitlines()
    )

def make_choppy(s: str) -> str:
    """
    Adds a period after each word in a string.
    """
    lines = s.splitlines()
    processed_lines = ['. '.join(line.split()) + '.' if line.strip() else '' for line in lines]
    return '\\n'.join(processed_lines)

root_agent = Agent(
    name="haiku_utilities_agent",
    description="An ADK agent that can perform a variety of haiku-related tasks.",
    model="gemini-2.5-flash",
    instruction=PROMPT,
    tools=[
        louder_haiku,
        quieter_haiku,
        spooky_case,
        make_choppy,
    ],
    output_key="haiku_utilities_agent_output",
)

region = os.getenv('GOOGLE_CLOUD_REGION', 'us-central1')
project_number = os.getenv('GOOGLE_PROJECT_NUMBER')

# Determine if running locally or in Cloud Run
is_local = os.getenv('K_SERVICE') is None

# If deploying to Cloud Run, pre-generate the host URL according to
# Cloud Run's URL structure for use in the A2A Agent Card
protocol = "http" if is_local else "https"
host = "localhost" if is_local else f"{SERVICE_NAME}-{project_number}.{region}.run.app"

# Use port 8002 for local testing, and 443 for Cloud Run, since it uses HTTPS
port = 8002 if is_local else 443

a2a_app = to_a2a(root_agent, host=host, port=port, protocol=protocol)
The new utilities agent will encapsulate our louder_haiku() method, and a few other string manipulation (quieter_haiku() and spooky_case()) functions that change the casing of the letters or add periods to the haiku.
Let’s copy the .sample-env file and create an .env file. If you have already completed this step for the a2a-validator agent, you can copy the same .env file into this directory. Otherwise, replace the sample values with a Gemini API key (you can create an API key here), your GCP project, and your region.
Example .env file:
GOOGLE_API_KEY=abc123key
GOOGLE_CLOUD_PROJECT=my-adk-project
GOOGLE_CLOUD_LOCATION=us-central1
# Leave these values as-is, pointing back the above ones
GOOGLE_CLOUD_REGION=${GOOGLE_CLOUD_LOCATION}
GEMINI_API_KEY=${GOOGLE_API_KEY}
To run the utilities agent locally, we can follow these commands.
# From project root, cd into A2A directory
cd a2a_utilities

# Create a virtual environment and install requirements
uv venv
source .venv/bin/activate
uv pip install -r requirements.txt

# Startup command
uv run uvicorn agent:a2a_app --host localhost --port 8002
We can test the functionality of the validator with the /a2a_utilities/test_client.py script, which will interact with the A2A agent through the a2a library using methods like A2ACardResolver and A2AClient.
# In a new terminal window, cd into the A2A utilities directory from the project root
cd a2a_utilities

# Re-activate the virtual environment
source .venv/bin/activate

# Test our local A2A server
python test_client.py --base-url <http://localhost:8002>
The output of the test script should look like this:
========================= ALL TESTS COMPLETE =========================
Aggregating results into a summary table...

--------------------------------------------------------------------------------
| Transformation  | Result                                                       |
|-----------------|-------------------------------------------------------------|
| Spooky Case     | aN OlD SiLeNt pOnD... a fRoG JuMpS InTo tHe pOnD— sPlAsH! sIlEnCe aGaIn. |
| Louder          | AN OLD SILENT POND... A FROG JUMPS INTO THE POND— SPLASH! SILENCE AGAIN. |
| Quieter         | an old silent pond... a frog jumps into the pond— splash! silence again. |
| Make Choppy     | An. old. silent. pond.... A. frog. jumps. into. the. pond—. Splash!. Silence. again.. |
--------------------------------------------------------------------------------
Deploying the Haiku Agents to Cloud Run

Now that we’ve de-coupled our validator and utility functions into standalone A2A agents, let’s deploy them to Cloud Run.
First, let’s deploy the haiku validator agent.
# Make sure you're in the A2A validator subdirectory
cd a2a_validator

# Set the variables used in your .env file to the terminal session
source .env

# Deploy
gcloud run deploy a2a-validator \
    --port=8080 \
    --source=. \
    --allow-unauthenticated \
    --min-instances=1 \
    --region="us-central1" \
    --project=$GOOGLE_CLOUD_PROJECT \
    --set-env-vars=GOOGLE_CLOUD_PROJECT=$GOOGLE_CLOUD_PROJECT,GOOGLE_CLOUD_LOCATION=$GOOGLE_CLOUD_LOCATION,GOOGLE_GENAI_USE_VERTEXAI=true,GOOGLE_PROJECT_NUMBER=$GOOGLE_PROJECT_NUMBER

# If you are running for the first time and see this prompt, select "Y":

# Deploying from source requires an Artifact Docker repository to store built containers. A repository named
# [cloud-run-source-deploy] in region [us-central1] will be created.
# Do you want to continue (Y/n)? Y

# Test with the outputted URL from the above deploy command
python test_client.py --base-url https://a2a-validator-<PROJECT-NUMBER>.us-central1.run.app
Next, let’s deploy the utilities agent.
# Make sure you're in the A2A utilities subdirectory
cd a2a_utilities

# Set the variables used in your .env file to the terminal session
source .env

# Deploy
gcloud run deploy a2a-utilities \
    --port=8080 \
    --source=. \
    --allow-unauthenticated \
    --min-instances=1 \
    --region="us-central1" \
    --project=$GOOGLE_CLOUD_PROJECT \
    --set-env-vars=GOOGLE_CLOUD_PROJECT=$GOOGLE_CLOUD_PROJECT,GOOGLE_CLOUD_LOCATION=$GOOGLE_CLOUD_LOCATION,GOOGLE_GENAI_USE_VERTEXAI=true,GOOGLE_PROJECT_NUMBER=$GOOGLE_PROJECT_NUMBER

# If you are running for the first time and see this prompt, select "Y":

# Deploying from source requires an Artifact Docker repository to store built containers. A repository named
# [cloud-run-source-deploy] in region [us-central1] will be created.
# Do you want to continue (Y/n)? Y

# Test with the outputted URL from the above deploy command
python test_client.py --base-url https://a2a-utilities-<PROJECT-NUMBER>.us-central1.run.app
Now that we’ve deployed our the validator and utilities agents to Cloud Run, let's integrate those agents into the original haiku generator to see all the functionality in one place.
- Navigate to
haiku-app/app/agent.py- Flip the boolean value
SHOULD_USE_EXTERNAL_A2A_VALIDATORtoTrue - Uncomment the line in the
sub_agentslist that saysutilities_a2a_agent
- Flip the boolean value
Full file should look like this:
import os

import google.auth
from google.adk.agents import Agent
from google.adk.agents.remote_a2a_agent import RemoteA2aAgent, AGENT_CARD_WELL_KNOWN_PATH
from .sub_agents.haiku_validator.agent import haiku_validator_agent as validator_local_agent

_, project_id = google.auth.default()
os.environ.setdefault("GOOGLE_CLOUD_PROJECT", project_id)
os.environ.setdefault("GOOGLE_CLOUD_LOCATION", "global")
os.environ.setdefault("GOOGLE_GENAI_USE_VERTEXAI", "True")

validator_a2a_url = os.getenv("HAIKU_VALIDATOR_AGENT_URL", "http://localhost:8001")
utilities_a2a_url = os.getenv("HAIKU_UTILITIES_AGENT_URL", "http://localhost:8002")

validator_a2a_agent = RemoteA2aAgent(
    name="validator_a2a_agent",
    description="A remote A2A Agent that handles haiku validation.",
    agent_card=(
        f"{validator_a2a_url}/{AGENT_CARD_WELL_KNOWN_PATH}"
    ),
)

utilities_a2a_agent = RemoteA2aAgent(
    name="utilities_a2a_agent",
    description="A remote A2A Agent that handles haiku utility functions.",
    agent_card=(
        f"{utilities_a2a_url}/{AGENT_CARD_WELL_KNOWN_PATH}"
    ),
)

PROMPT = """
You are a haiku generator.
Ask the user for a topic or an idea to create a haiku.
Do your best to follow the 5-7-5 syllable structure.

If the user asks you to validate the haiku, use the validator_agent.

If the user asks you to call any of the following utility functions,
use the utilities_a2a_agent (if available, otherwise, respond that the utility functions are not available):
- Louder: Convert the entire haiku to uppercase.
- Quieter: Convert the entire haiku to lowercase.
- Spooky Case: Alternate the case of all letters in the haiku.
- Make Choppy: Add a period after each word in the haiku.
"""

# For our haiku validator, we can use this toggle to switch between our embedded sub-agent validator within the ADK app,
# or use an externally hosted A2A server
SHOULD_USE_EXTERNAL_A2A_VALIDATOR = True
validator_agent = validator_a2a_agent if SHOULD_USE_EXTERNAL_A2A_VALIDATOR else validator_local_agent

def louder_haiku(text: str) -> str:
    """Converts the entire text block to uppercase."""
    return text.upper()

root_agent = Agent(
    name="root_agent",
    model="gemini-2.5-flash",
    instruction=PROMPT,
    tools=[
        # Uncomment when needed
        # louder_haiku,
        ],
    sub_agents=[
        validator_agent,
        utilities_a2a_agent
        ],
)
- Copy
haiku-app/.sample-envto a file named.env, and fill out the fieldsHAIKU_VALIDATOR_AGENT_URLandHAIKU_UTILITIES_AGENT_URLwith the GCP URLs from the A2A deployments.https://a2a-validator-<PROJECT-NUMBER>.us-central1.run.apphttps://a2a-utilities-<PROJECT-NUMBER>.us-central1.run.app
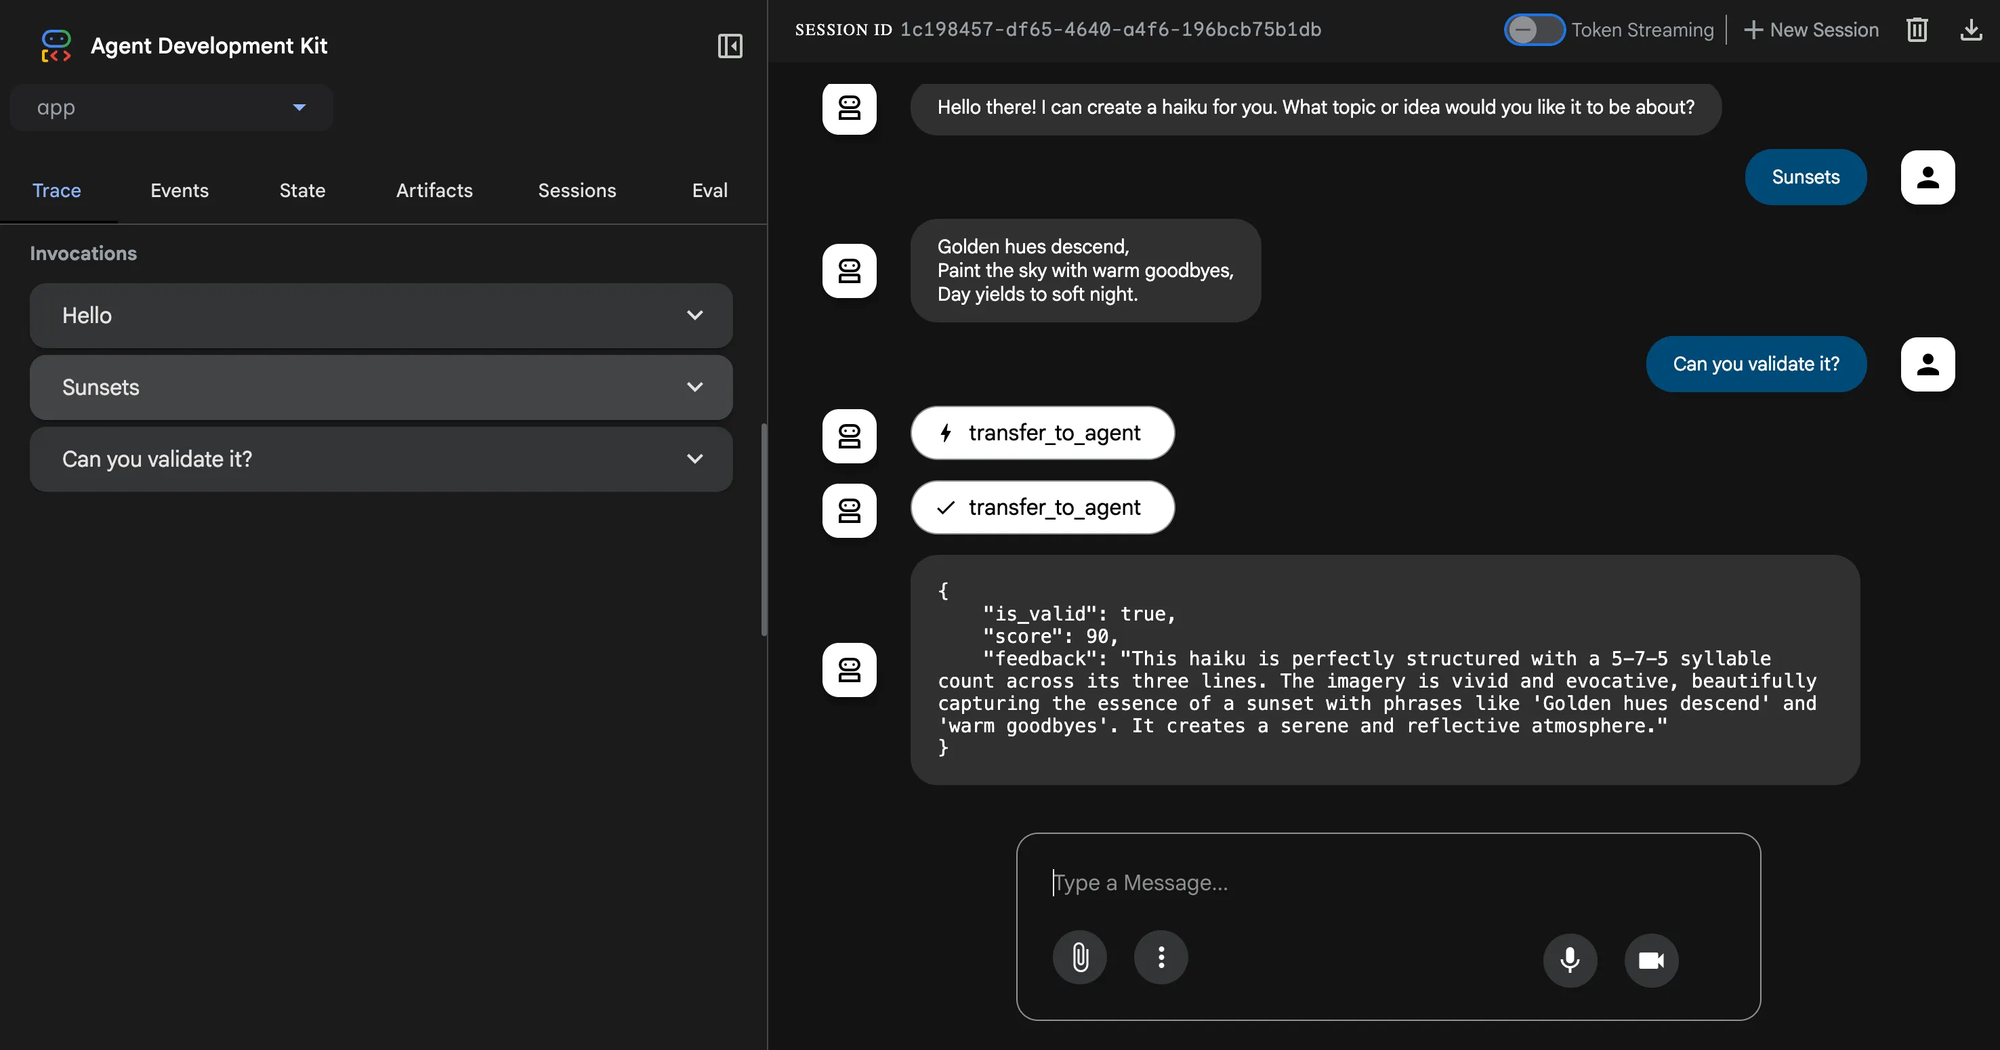
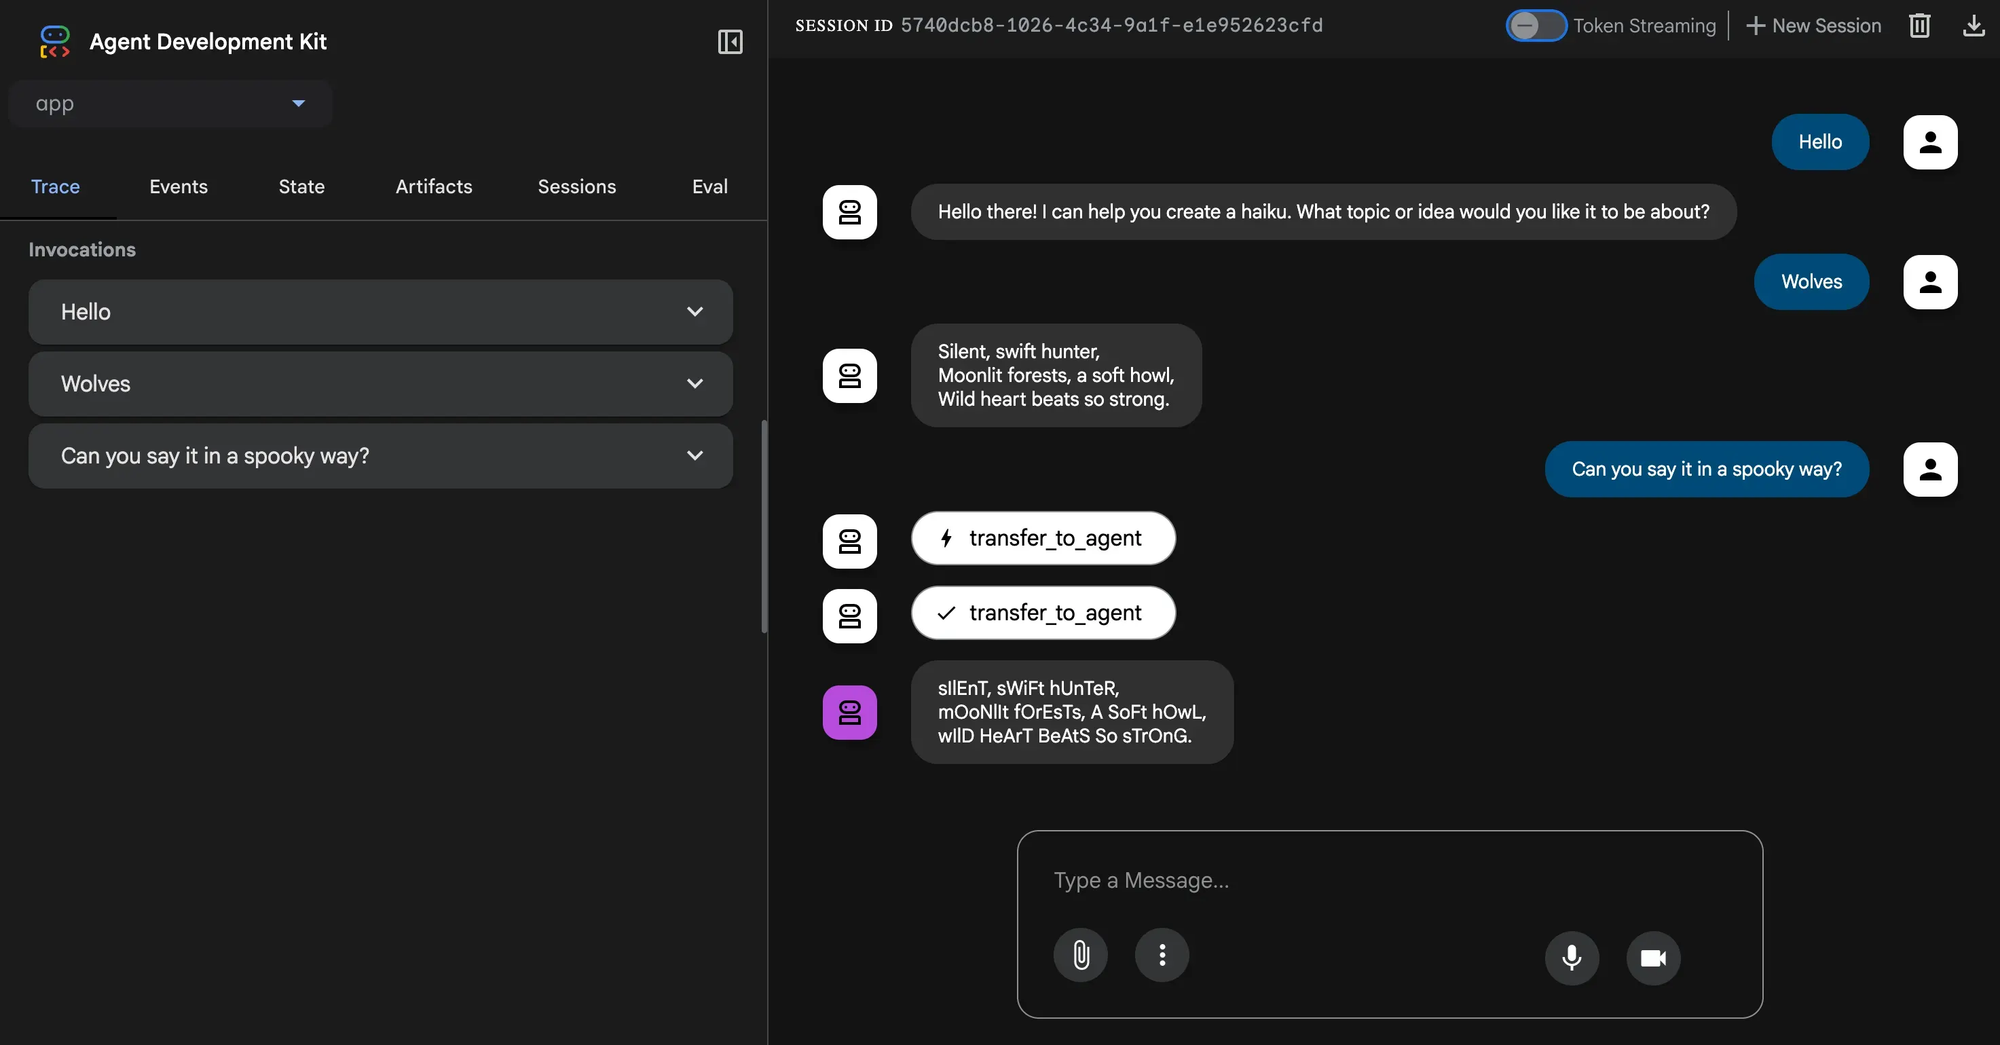
- Navigate back to the
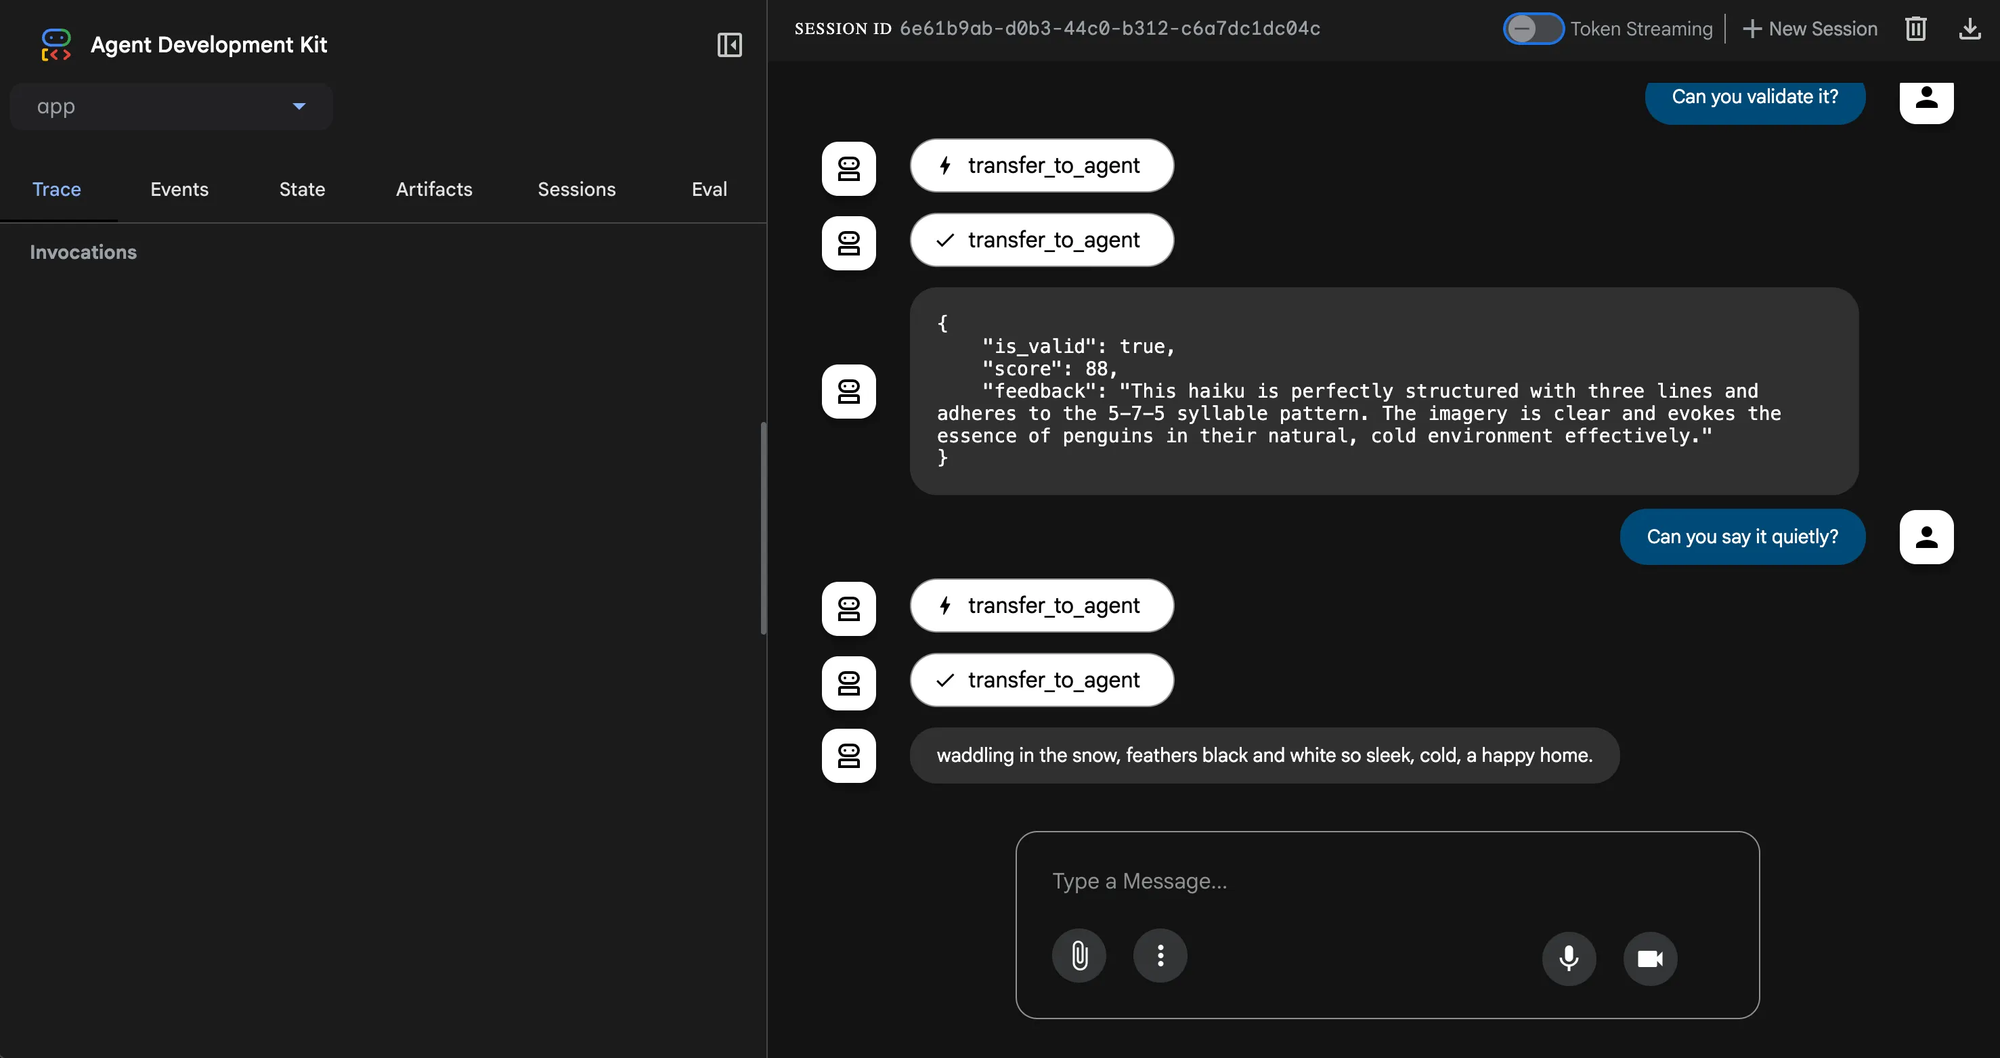
haiku-app/to test our base agent- In that directory, run
make playground - The output will display a localhost link that looks like
http://127.0.0.1:8501 - Open that link up in a new browser tab, and remember to select
appin the top left drop down selector - Converse with your agent to generate a haiku and ask to validate or transform it
- In that directory, run
Let’s deploy our base haiku generator by running the make backend command and passing the URLs of our deployed A2A agents, so that the full haiku system is in the cloud and communicating with each other.
# From the project root, cd into our primary haiku direcotry
cd haiku-app

# Deploy with the live Cloud Run URLs of the A2A agents
make backend A2AVALIDATORURL=<VALIDATOR_URL> UTILITIESURL=<UTILITIES_URL> IAP=true
This will deploy the playground UI and let you interact with all your haiku agents.
Conclusion
By building our haiku ecosystem with the ADK and two A2A agents, we now have the building blocks of how to develop and deploy more complex, production ready systems. We can define more sub-agents and A2A servers as needed, and even let others use your deployed agents in their own LLM development. These agentic architectures are flexible and extensible, and allow us to build tailored solutions that leverage LLMs.
In our next article of this ADK series, we will explore the Agent Payments Protocol (AP2), a framework that empowers agents to send and receive payments autonomously.
Here at SZNS Solutions, we have extensive experience building out ADK data pipelines to help our clients automate and process their tasks faster and more reliably.
For more information on how SZNS Solutions can help you and your business, reach out to us here: https://szns.solutions/contact